Examination of the Chest
NOTE: This study guide is an overview for examination of the chest
including the cardiovascular and respiratory
systems. Refer to the system specific study guides for more detail.
- The patient must be properly undressed and gowned for this examination.
- Ideally the patient should be sitting on the end of an exam table.
- The examination room must be quiet to perform adequate percussion and
auscultation.
- Try to visualize the underlying anatomy as you examine the patient.
- Observe for asymmetry or deformity. Note any scars, lesions, or rashes. [p238, p248] [1] [2]
- Observe the rate, rhythm, depth, and effort of breathing.
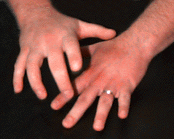
- Observe the apical impulse if possible. [p286] [3]
- Identify any areas of tenderness or deformity by palpating the ribs and sternum. [p238,
p248]
- Assess expansion and symmetry of the chest by placing your hands on the patient's back,
thumbs together at the midline, and ask them to breath deeply.
- Assess the size and position of the apical impulse. [p287]
- Hyperextend the middle finger of one hand and place the distal interphalangeal joint firmly
against the patient's chest. [p241]
- With the end (not the pad) of the opposite middle finger, use a quick flick of the wrist
to strike first finger.
- Categorize what you hear as normal, dull, or hyperresonant.
- Practice your technique until you can consistantly produce a "normal"
percussion note on your (presumably normal) partner before you work with patients.

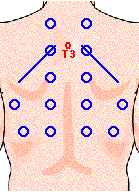
- Percuss from side to side and top to bottom using the pattern shown in the illustration.
Omit the areas covered by the scapulae. [p243]
- Compare one side to the other looking for asymmetry.
- Note the location of any abnormal percussion sounds you hear.
- Percuss from side to side and top to bottom using the pattern shown in the illustration.
[p249]
- Compare one side to the other looking for asymmetry.
- Note the location of any abnormal percussion sounds you hear.
- Auscultate from side to side and top to bottom using the pattern shown in the
illustration above. Omit the areas covered by the scapulae. [p244]
- Compare one side to the other looking for asymmetry.
- Note the location of any abnormal sounds you hear. [4]
- Auscultate from side to side and top to bottom using the pattern shown in the
illustration above. [p250]
- Compare one side to the other looking for asymmetry.
- Note the location of any abnormal sounds you hear. [4]
- Position the patient supine with the head of the table slightly elevated. [p291-292]
- Always examine from the patient's right side. A quiet room is essential.
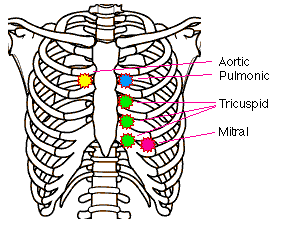
- Listen with the diaphragm at the right 2nd interspace near the sternum (aortic area).
- Listen with the diaphragm at the left 2nd interspace near the sternum (pulmonic area).
- Listen with the diaphragm at the left 3rd, 4th, and 5th interspaces near the sternum
(tricuspid area). [5]
- Listen with the diaphragm at the apex (mitral area).
- Record the rate, rhythm, and any extra sounds you hear. [4]
- Page numbers refer to Barbara Bates' A Guide to Physical
Examination and History Taking, Sixth Edition , published by Lippincott in 1995.
- Inspection and palpation can focus on any or all of the three
"organ systems" present in the chest: chest wall (skin, ribs, etc.),
respiratory, and cardiovascular. If you are only interested in the heart you do not have
to inspect and palpate the entire chest. On the other hand, if you are only interested in
the chest wall, you do not have to look for the apical impulse and so on.
- The apical impulse is also known as the apical pulse or point of
maximal impulse (PMI).
- Abnormal heart and lung sounds are covered in the cardiovascular and respiratory study guides.
- Left Sternal Border - The left 3rd, 4th, and 5th interspaces are
considered the tricuspid area and are referred to as the Lower Left Sternal Border or
LLSB.
Author:
Richard Rathe, MD
Copyright: 1996 by the University of Florida